Integration guide
This guide provides a detailed overview of how to integrate with WorldTrade.
Integration process overview
The integration process is divided into the following steps:
Prepare for integration
Review relevant documents
Before starting integration with WorldFirst, review the relevant documentation to understand the subsequent integration steps. The key documents include:
- Integration guide (this document): Outlines the integration process step-by-step.
- API overview: Details the structure of message transmission, including the format of request headers and response headers.
- Sign a request and validate the signature: Explains how to sign requests and verify responses, along with providing signature examples.
- API list: Provides information on available APIs, their call directions, and business purposes.
- Idempotency: Offers an overview of idempotency parameters for API calls.
Design an integration plan
Contact the WorldFirst technical support team to develop a customized integration plan.
Exchange authentication information and other details
The following table outlines the information that must be exchanged between you and WorldFirst in both testing and production environments:
Environment | Information to obtain from WorldFirst | Information to provide to WorldFirst |
Testing Environment | WorldFirst test accounts (for both buyer and seller) | Public key generated per Sign a request and validate the signature |
WorldFirst public key | Notification URL | |
Domain address | Caller IP | |
clientId | ||
Production Environment | WorldFirst buyer account (optional) | Public key generated per Sign a request and validate the signature |
WorldFirst public key | MID number | |
Domain address | ||
clientId |
Table 1. Information exchange requirements in both testing and production environments.
Develop and integrate
Develop and integrate in collaboration with the WorldFirst team to fit your business needs. WorldTrade Solution offers functionalities such as file uploads, order creation, payment initiation, order detail retrieval, and shipment request processing. Some APIs are interdependent; therefore, follow the steps below when developing and integrating your product.
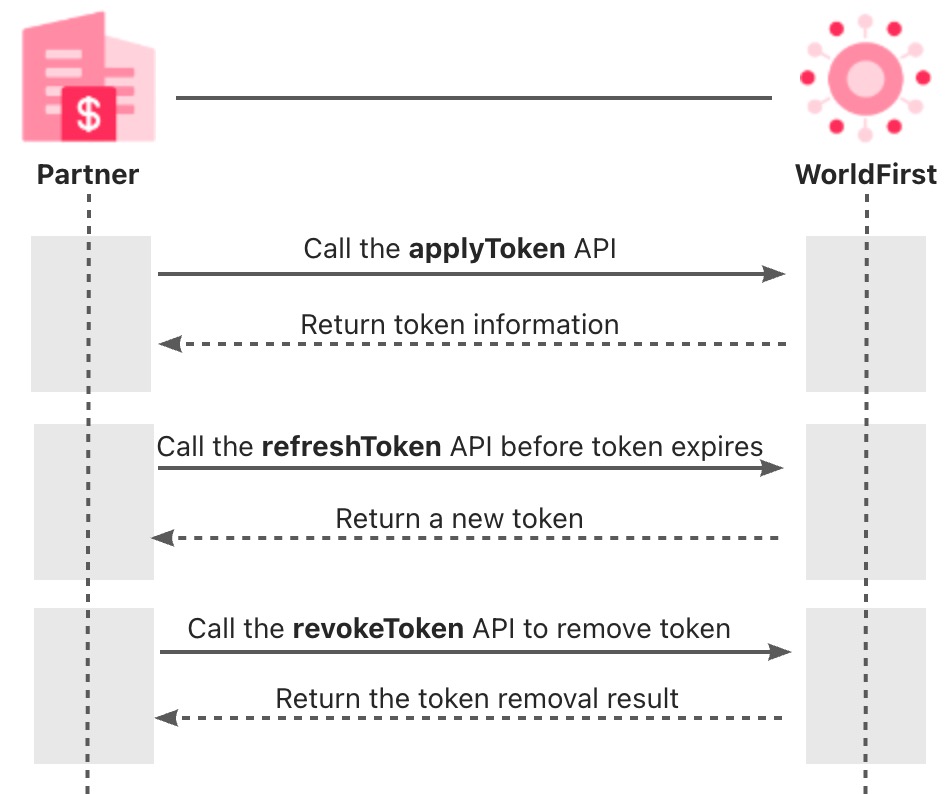
OAuth (Optional)
Obtain tokens via OAuth authorization to use WorldTrade APIs. The diagram below shows the integration procedure:

Figure 1. Partner calls the APIs to obtain OAuth token
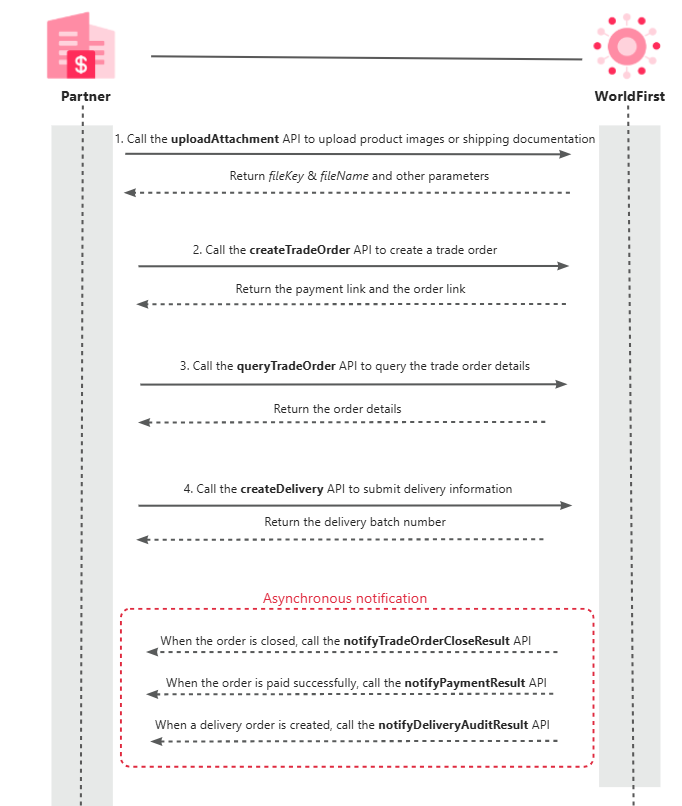
Order management and notifications
The diagram below shows the integration procedure for order management and notifications from WorldFirst:

Figure 2. Partner calls the APIs to manage orders and obtain notifications from WorldFirst
Step 1: Upload attachments
Call the uploadAttachment API to upload relevant files such as product images or shipping documentation. Make sure you set the bizType parameter to the correct value:
- When uploading attachments for a trade order, set bizType to
WT_B2B_TRADE_PRODUCT. - When uploading attachments for a delivery order, set bizType to one of the following values:
WT_B2B_DELIVERY_LOGISTICSWT_B2B_DELIVERY_OTHERWT_B2B_DELIVERY_ENTRY
If the API call is successful, WorldFirst will return the fileKey and fileName parameters, which are needed as inputs for subsequent APIs like createTradeOrder or createDelivery.
Note: If you need to upload product images in batches, skip this step and call the createTradeOrder API in Step 2. By using the productList.imageFile.fileUrl parameter, you can simply upload the file url which contains all the product images.
Step 2: Create trade order
Call the createTradeOrder API to upload detailed trade order information and generate a WorldFirst order. After an order is successfully created, WorldFirst returns the order link and the order payment link.
Note:
- The input parameter requestId is idempotent and must have a unique value for each API call.
- To receive notifications from WorldFirst, ensure you specify the following parameters with valid URLs: payResultNotifyUrl, orderResultNotifyUrl, and deliveryResultNotifyUrl.
If an order fails the WorldFirst risk assessment, WorldFirst will call the notifyTradeOrderCloseResult API with the detailed results.
Step 3: Query order details
After creating an order, you can use the queryTradeOrder API to fetch order details, including payment phases (e.g., deposit/final payment or full payment), payment results, and delivery information.
Step 4: Create delivery order
With the returned messages from Step 1 and Step 2, call the createDelivery API to initiate shipment requests. If the request is successful, WorldFirst will return the delivery batch number.
Note:
The input parameter requestId is idempotent and must be unique for every request.
Notification regarding delivery approval or rejection will be sent via the notifyDeliveryAuditResult API.
Step 5: Receive and respond to notifications
WorldFirst calls the following notification APIs and sends audit and payment results to you if you have specified the valid URLs for payResultNotifyUrl, orderResultNotifyUrl, and deliveryResultNotifyUrl parameters during the createTradeOrder API call in Step 2:
- notifyTradeOrderCloseResult: Called only when an order fails audit approval.
- notifyPaymentResult: Called only when buyer payments are successful.
- notifyDeliveryAuditResult: Called for both successful and rejected delivery audits.
Note:
- Upon receiving a notification from WorldFirst, you must send a response to confirm receipt.
- Refer to the API overview section for details on the response header structure.
- You must also sign the response message as per Sign a request and validate the signature.
Conduct acceptance testing
Contact the WorldFirst technical team to understand the acceptance testing process, obtain test cases, and produce an integration report.
Launch into production
Once acceptance testing is completed, switch your product build to your production environment. Update any required parameters, such as clientId, keys, and other settings, and proceed to deploy the integration in the production environment.
